Quick Answer
Fiberglass pool installation is one of the fastest and most affordable ways to add an inground swimming pool to your backyard, whether you’re hiring a contractor or managing the project yourself.
Perhaps even more surprising is this: fiberglass pool installation can absolutely be a DIY project.
That doesn’t necessarily mean you’ll be digging the hole, operating heavy equipment, or wiring electrical components yourself. For many homeowners, DIY simply means acting as the project’s general contractor—coordinating subcontractors, managing the schedule, and deciding which tasks to tackle personally.
Whether you plan to complete every step yourself or simply manage the project from start to finish, understanding the installation process will help you save money, avoid costly mistakes, and build a pool that will provide decades of enjoyment.
What Does DIY Really Mean?
When most people hear “DIY fiberglass pool installation,” they picture someone operating an excavator, plumbing the equipment pad, pouring concrete, and finishing every detail alone.
While some homeowners absolutely do that, it’s far from the only way to approach a DIY installation.
In fact, one of the most common approaches is becoming your own general contractor.
Instead of hiring one company to manage the entire project, you coordinate each stage yourself.
That may include:
- Hiring an excavation contractor.
- Scheduling the crane to set the pool shell.
- Working with a licensed electrician when required by local code.
- Hiring a concrete crew for the deck.
- Completing the plumbing yourself.
- Managing inspections and permits.
- Coordinating deliveries and timelines.
You’re still running the project—you’ve simply chosen where to invest your own time and where hiring a professional makes the most sense.
For many homeowners, this owner-builder approach can reduce costs significantly while giving them complete control over the quality and timeline of the project.
💡 Pool Professor
One of the biggest misconceptions in the pool industry is that DIY means doing every single task yourself.
It doesn’t.
Think of it like building a custom home.
Very few homeowners pour their own foundation, frame every wall, install the HVAC system, and wire the electrical panel.
Instead, they manage the project, hire specialists when needed, and keep everything moving.
A fiberglass pool installation works the same way.
Whether you complete 20% of the work or 100% of it, you’re still the one making the decisions—and that’s where many of the savings come from.
Fiberglass Pool Installation: Can You Install It Yourself?
The simple answer is yes.
Thousands of fiberglass pools are successfully installed every year by homeowners and owner-builders across the country.
Fiberglass pools are especially well suited for DIY projects because the shell is already manufactured before it arrives at your property.
You’re not building a pool from scratch.
You’re installing a finished product.
That eliminates many of the time-consuming construction steps associated with concrete pools, including forming walls, installing rebar, applying multiple layers of concrete, plastering, and waiting for everything to cure.
Of course, fiberglass pool installation is still a major construction project.
It requires planning, patience, attention to detail, and a willingness to learn.
The more prepared you are before excavation begins, the smoother the entire project will go.
Why Fiberglass Pools Are Perfect for DIY Projects
Not every type of swimming pool is equally DIY friendly.
Fiberglass pools have several advantages that make them an excellent choice for homeowners who want to manage their own installation.
Factory-Built Precision
Every fiberglass pool shell is manufactured in a controlled factory environment before it ever reaches your property.
That means your pool already includes:
- Finished gel coat surface
- Integrated steps and benches
- Structural reinforcement
- Pre-engineered plumbing locations
- A one-piece shell designed for strength and durability
Much of the difficult construction work has already been completed before delivery day.
Faster Installation
Concrete pools often require several months to complete.
Fiberglass pool installation moves much faster because the shell arrives ready to install.
Once excavation is complete and the base has been properly prepared, the pool can often be placed in a matter of hours.
From there, plumbing, backfilling, decking, and finishing work can begin.
Less time under construction means you can start enjoying your backyard sooner.
Significant Cost Savings
Labor is one of the largest expenses in any pool project.
By managing the installation yourself—or completing portions of the work—you can often reduce the overall cost of your project.
Some homeowners choose to:
- Complete nearly every step themselves.
- Hire excavation only.
- Hire a crane service to set the shell.
- Bring in licensed trades only when required.
- Complete the remaining work at their own pace.
There isn’t one correct way to approach a DIY installation.
The best plan is the one that matches your experience, budget, available equipment, and comfort level.
Estimated DIY Fiberglass Pool Installation Costs
| Item | Estimated Cost |
|---|---|
| Excavation | $2,000+ |
| Pea Gravel or Crushed Stone Backfill | $600–$1,000 |
| Crane Service (if needed) | About $1,700 |
| Water Truck (Pool Fill) | About $200 |
| Concrete or Paver Deck Installation | Starting around $3,000+ |
Estimated Total (Major Installation Costs)
Approximately $7,500–$7,900 (plus the cost of your pool shell, equipment, permits, plumbing materials, electrical work, and any landscaping).
Note: These are estimated costs for common owner-builder installation expenses. Actual pricing varies based on your location, pool size, site accessibility, soil conditions, and the amount of work you complete yourself.
💡 Pool Professor
One of the biggest advantages of acting as your own general contractor is deciding where your money goes.
Maybe you hire an excavation contractor but handle the plumbing yourself. Maybe you rent equipment and dig the hole, then hire a crane operator to set the shell. You might even save the concrete deck for a later phase and enjoy the pool before completing the surrounding patio.
DIY isn’t about doing every task yourself—it’s about managing the project and choosing where to spend your time versus your money. That’s how many owner-builders save thousands of dollars while still ending up with a professionally finished backyard.
Why Getting Multiple Installation Quotes Matters
If you decide to hire a professional installer, don’t stop after the first estimate.
Many homeowners are surprised by how much installation quotes can vary. Some companies will visit your property, inspect the site, and present a turnkey proposal that includes every aspect of the project—from excavation and plumbing to decking, landscaping, and project management. That level of service can be convenient, but it often comes with a significantly higher price tag.
If your goal is to save money, ask for an itemized quote so you understand exactly what you’re paying for. You may find that certain portions of the project can be completed yourself or hired out separately for less.
💡 Pool Professor
One of our favorite phone calls is from a homeowner who says:
“An installer just came out and the quote was way higher than I expected.”
That’s often the moment people realize they have options.
You don’t have to hire one company to do everything.
Whether you choose to complete parts of the project yourself or simply act as your own general contractor, you can often reduce your overall installation costs by deciding which tasks you want to manage and which ones make sense to subcontract.
At Pool Shell Pros, we’re happy to help you understand the installation process so you can make the decision that’s right for your budget—not someone else’s sales process. Most installations take a day and a half and cost around $10,000-$20,000 (unless you’re building the grotto at the Playboy mansion).
Step 1: Planning Your Fiberglass Pool Installation
The installation actually begins long before the excavator arrives.
Good planning prevents expensive surprises later.
Before ordering your fiberglass pool, consider:
- Local permits
- HOA approval
- Property setbacks
- Utility locations
- Drainage
- Delivery access
- Crane access
- Equipment location
- Future decking
- Landscaping plans
One of the biggest mistakes homeowners make is focusing only on where the pool will sit.
You also need to think about how the shell will get there.
A delivery truck may need access to your property, and some installations require a crane to lift the shell over the house or into a tight backyard.
Planning those logistics early can prevent delays and unexpected costs.
💡 Pool Professor
People spend weeks choosing the perfect pool.
Then they spend about five minutes thinking about how a 30-foot fiberglass shell is actually going to reach the backyard.
Don’t be that homeowner.
Before your shell ships, make sure you’ve planned the delivery route, crane access if needed, and where construction equipment will enter and leave the property.
Your landscaping will thank you later.
Choosing the Best Location
Where you place your pool affects more than appearance.
A well-planned location can improve drainage, reduce maintenance, and make your backyard more enjoyable for years to come.
Look for a location that offers:
- Good drainage
- Plenty of sunlight
- Easy access from your home
- Space for decking
- Room for future landscaping
- Distance from large trees when practical
It can also help to think ahead.
If you plan to add an outdoor kitchen, pergola, fire pit, or patio in the future, leaving space now is much easier than redesigning the backyard later.
Step 2: Excavation
Excavation is where your project truly begins to take shape.
Once utilities have been marked and permits have been approved, the installation area is excavated according to the manufacturer’s specifications.
The goal isn’t simply digging a hole.
The excavation must be the correct size, depth, and shape while allowing room for plumbing, backfill materials, and proper drainage.
Accuracy matters.
A carefully prepared excavation makes every remaining step easier.
💡 Pool Professor
People think excavation is the hardest part.
It isn’t.
Getting everything perfectly level is.
Take your time.
Measure twice.
Check your elevations.
Then check them again.
The pool shell can only perform as well as the foundation beneath it.
Pool Shell Pros will provide you with a “dig Sheet” a blue print on how that hole should be dug for your exact shell. Simply hand it to the excavator who will understand how to read it and let them be.
Preparing the Base
Before the fiberglass shell is lowered into the excavation, the base must be carefully prepared.
Depending on the manufacturer’s recommendations and your soil conditions, this typically involves placing and leveling a stable base material that provides uniform support beneath the entire shell.
A properly prepared base helps distribute weight evenly, minimizes settling, and creates the stable foundation your pool will rely on for decades.
Taking extra time here is one of the best investments you can make in the success of your fiberglass pool installation.
Step 3: Delivering the Pool Shell
Delivery day is one of the most exciting parts of the entire project.
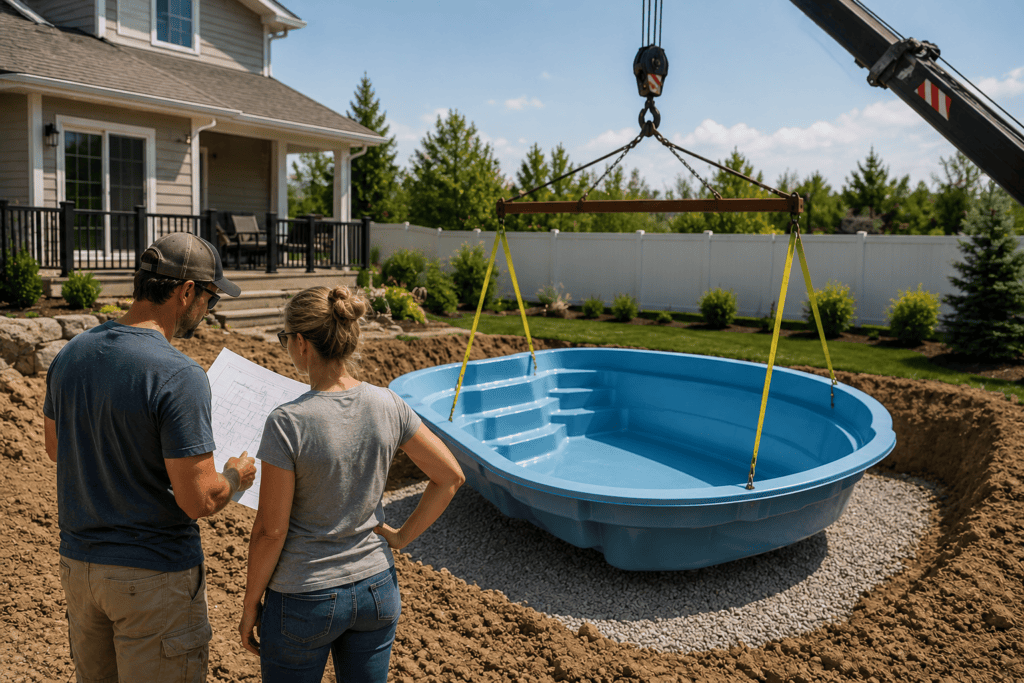
Your fiberglass pool shell arrives fully manufactured on a specialized trailer and is carefully transported to your property. Depending on your home’s layout, the shell may be unloaded directly into the excavation or lifted into place using a crane.
This is another reason planning ahead is so important.
Before delivery day, make sure:
- The delivery truck has adequate access.
- Low-hanging branches have been trimmed if necessary.
- Gates and fences are wide enough.
- The crane has enough room to operate safely if one is required.
- Everyone involved knows the installation plan.
Watching a one-piece fiberglass pool float through the air is something you’ll probably never forget.
It’s also a reminder that preparation makes everything easier.
💡 Pool Professor
A crane isn’t a sign your installation is complicated.
In Fact Pool Shell Pros is pretty good at timing the delivery of your shell so the excavator can just take the pool off the truck with straps and set it so the crane isn’t needed.
It’s simply the safest and most efficient way to place a fiberglass pool shell when direct access isn’t available.
Many homeowners assume needing a crane means something has gone wrong.
Usually, it’s just another planned step in the installation.
Step 4: Setting the Pool Shell
Once the shell is positioned above the excavation, it’s slowly lowered onto the prepared base.
This isn’t a rushed process.
The shell is checked repeatedly to ensure it’s perfectly level from front to back, side to side, and corner to corner.
Minor adjustments are much easier now than after plumbing and backfilling begin.
Laser levels, measuring tools, and patience are your best friends during this stage.
Taking the time to get the shell positioned correctly helps ensure years of trouble-free ownership.
Step 5: Plumbing and Equipment
With the shell in place, attention turns to the plumbing system.
Depending on your pool design, this may include:
- Skimmers
- Main drains (where applicable)
- Return lines
- Pool pump
- Filter
- Heater
- Saltwater system
- Automation equipment
- Pool lighting
If you’re comfortable working with PVC plumbing, many owner-builders complete this portion themselves.
Electrical work is different.
Many jurisdictions require electrical work to be completed or inspected by a licensed electrician. Always follow your local building codes and permitting requirements.
One of the benefits of acting as your own general contractor is that you decide which work you complete yourself and which work is better left to specialists.
Step 6: Backfilling
Backfilling is one of the most important stages of fiberglass pool installation.
As the pool is filled with water, backfill material is placed around the outside of the shell.
These two processes typically happen together.
Why?
Because keeping water inside the pool and backfill outside the pool at similar levels helps maintain balanced pressure on the shell throughout the installation.
Proper compaction and drainage are equally important.
Rushing this step or using the wrong material can create settling issues later.
Follow the manufacturer’s installation recommendations carefully.
🦀 Carl’s Complaint
Carl says:
“I’m trying to finish this thing by the weekend.”
We get it.
Once the pool is in the ground, it’s hard not to imagine jumping in immediately.
But the homeowners who end up happiest with their pools usually aren’t the fastest.
They’re the ones who slow down, double-check their work, and resist the urge to cut corners.
Pools are built for decades—not deadlines.
Step 7: Installing the Pool Deck
Once the shell is secure and plumbing has been completed, it’s time to create the area that ties everything together.
Popular decking materials include:
- Concrete
- Pavers
- Travertine
- Decorative stamped concrete
When planning your deck, think beyond appearance.
Consider:
- Drainage
- Slip resistance
- Maintenance
- Outdoor living space
- Furniture placement
- Future additions like pergolas or outdoor kitchens
Your deck is where family and friends will spend most of their time, so give it as much thought as the pool itself.
Step 8: Filling, Startup, and First Swim
As construction wraps up, the final steps begin.
This typically includes:
- Filling the pool completely.
- Starting the circulation system.
- Balancing the water chemistry.
- Checking all plumbing connections.
- Verifying equipment operation.
Before long, your project changes from a construction site into your new backyard retreat.
And yes…
The first cannonball is usually worth every hour you spent planning the project.
Common DIY Fiberglass Pool Installation Mistakes
Most installation problems aren’t caused by fiberglass.
They’re caused by skipping steps or rushing the process.
Some of the most common mistakes include:
- Poor drainage planning.
- Incorrect excavation depth.
- Failing to keep the shell level.
- Using improper backfill material.
- Ignoring manufacturer installation requirements.
- Underestimating delivery access.
- Skipping permits or inspections.
Fortunately, every one of these mistakes is avoidable with careful planning.
That’s exactly why we’ve created our complete DIY Fiberglass Pool Installation Guide, where each phase is covered in even greater detail.
🐢 Terry’s Take
The best DIY projects aren’t always the ones where you do everything yourself.
They’re the ones where you know when to pick up a shovel…
…and when to pick up the phone.
Being your own general contractor doesn’t mean doing every task.
It means making smart decisions, hiring help when it makes sense, and staying in control of your project from start to finish.
That’s how successful owner-builders think.
Frequently Asked Questions
How long does fiberglass pool installation take?
Many fiberglass pool installations are completed much faster than concrete pools (usually in 2-3 days) because the shell arrives fully manufactured. The overall timeline depends on permitting, weather, subcontractor scheduling, decking, and site conditions.
Can I install a fiberglass pool myself?
Yes.
Many homeowners successfully complete fiberglass pool installations themselves or act as their own general contractor by coordinating excavation, plumbing, electrical, decking, and inspections.
Do I need to do every part of the installation myself?
No.
DIY doesn’t mean doing every task yourself.
Many owner-builders hire excavation contractors, crane services, electricians, or concrete crews while managing the project themselves. This approach still provides significant savings compared to hiring one company to handle the entire installation.
Do fiberglass pools require a crane?
Not always.
Some properties allow direct placement from the delivery truck, while others require a crane to safely lift the shell into the excavation.
Is fiberglass pool installation easier than concrete?
Generally, yes.
Because the shell arrives finished, fiberglass pool installation eliminates many construction steps associated with concrete pools, including forming, rebar installation, plastering, and curing.
💡 Pool Professor’s Verdict
Here’s the biggest takeaway.
DIY doesn’t have to mean doing everything yourself.
For some homeowners, it means renting equipment and completing every step personally.
For others, it means acting as the general contractor—hiring the right people for specialized work while staying in control of the budget and schedule.
Neither approach is wrong.
The goal is building a beautiful pool that your family will enjoy for decades.
Whether you’re handling every task yourself or simply coordinating the project, careful planning, patience, and attention to detail will always matter more than who holds the shovel.
Ready to Start Your Fiberglass Pool Installation?
Whether you’re planning a fully hands-on DIY build or managing your project as an owner-builder, Pool Shell Pros is here to help.
Browse our selection of Small, Medium, and Large Fiberglass Pool Shells, explore our complete DIY Fiberglass Pool Installation Guide, or request a free quote to find the right shell for your backyard.
Our team is happy to answer questions, explain the installation process, and help you choose the perfect fiberglass pool for your project.
📞 Call Us Today: 855 44 SHELL
Disclaimer: These are estimated costs for common DIY/owner-builder installation expenses and are not guaranteed prices. Actual costs vary by location, site conditions, pool size, contractor rates, and the amount of work you complete yourself. This estimate does not include the fiberglass pool shell, equipment, permits, or optional features such as landscaping and fencing.